Our team is dedicated to finding and telling you more about the web’s best products. If you purchase through our links, we may receive a commission. Our editorial team is independent and only endorses products we believe in.
The experience of aging as a woman often feels like fumbling around in the dark for the next surprise. No textbook on what to expect or sage guide to gently lead the way. While I have enjoyed certain aspects (like an unshakeable confidence and maturity), I was not prepared for the tiny vain things I’d say goodbye to along the way — among them full hair, bouncy collagen, and most recently, lip pigment.
It obviously didn't happen overnight, but one day I looked in the mirror and my lips suddenly looked…tired. I still recognized (and loved) my face, but it looked slightly unfinished without the soft lip flush I had become reliant on. I realized that I had been layering tinted balm and liner daily, not to enhance, but to fill in what had quietly disappeared. However, this is not a new dilemma — and many before me have asked themselves the same question I asked myself now: Should I get my lips tattooed? Definitely.
We like
We don't like
So, What Is Lip Blushing?
If you’re unfamiliar, lip blushing is a form of cosmetic tattooing that uses pigment to enhance the lips’ natural color and shape. The result is a long-lasting flush — typically lasting two to three years (depending on lifestyle) — that sits somewhere between a stain and a tint. It’s not filler, not lipstick, and not meant to dramatically alter your face. Instead, think of it as a soft-focus enhancement: subtle definition, restored pigment, and the kind of balance that pulls everything together.
Most lip blushing treatments fall in the $500–$1,000 range depending on the artist and location, with a touch-up usually included or recommended within six to eight weeks. It’s an investment, but one that can easily replace years of liner, tint, and reapplication.
I booked with Studio Sashiko in Los Angeles, a studio known not just for their hyper-realistic work, but for their all-inclusive, deeply intentional approach to cosmetic and restorative tattooing. Their artists create everything from smatterings of freckles and impossibly natural brows to tattooed nipples for clients healing from mastectomies or undergoing gender-affirming surgery. But it’s also the kind of studio where you can get a full back tattoo masterpiece. Safe to say this place has range — and it felt like exactly the right fit for my foray into lip tattoos.
The Prep: Shade Matching and Shape Tweaking
The appointment began not with needles, but with conversation. The talented lip blush artist, Fruit, approached the process collaboratively and walked me through every step of the procedure. We made sure we were aligned on the final result: a slightly more defined Cupid’s bow, a fuller-looking lower lip, and an overall color correction that feels natural.
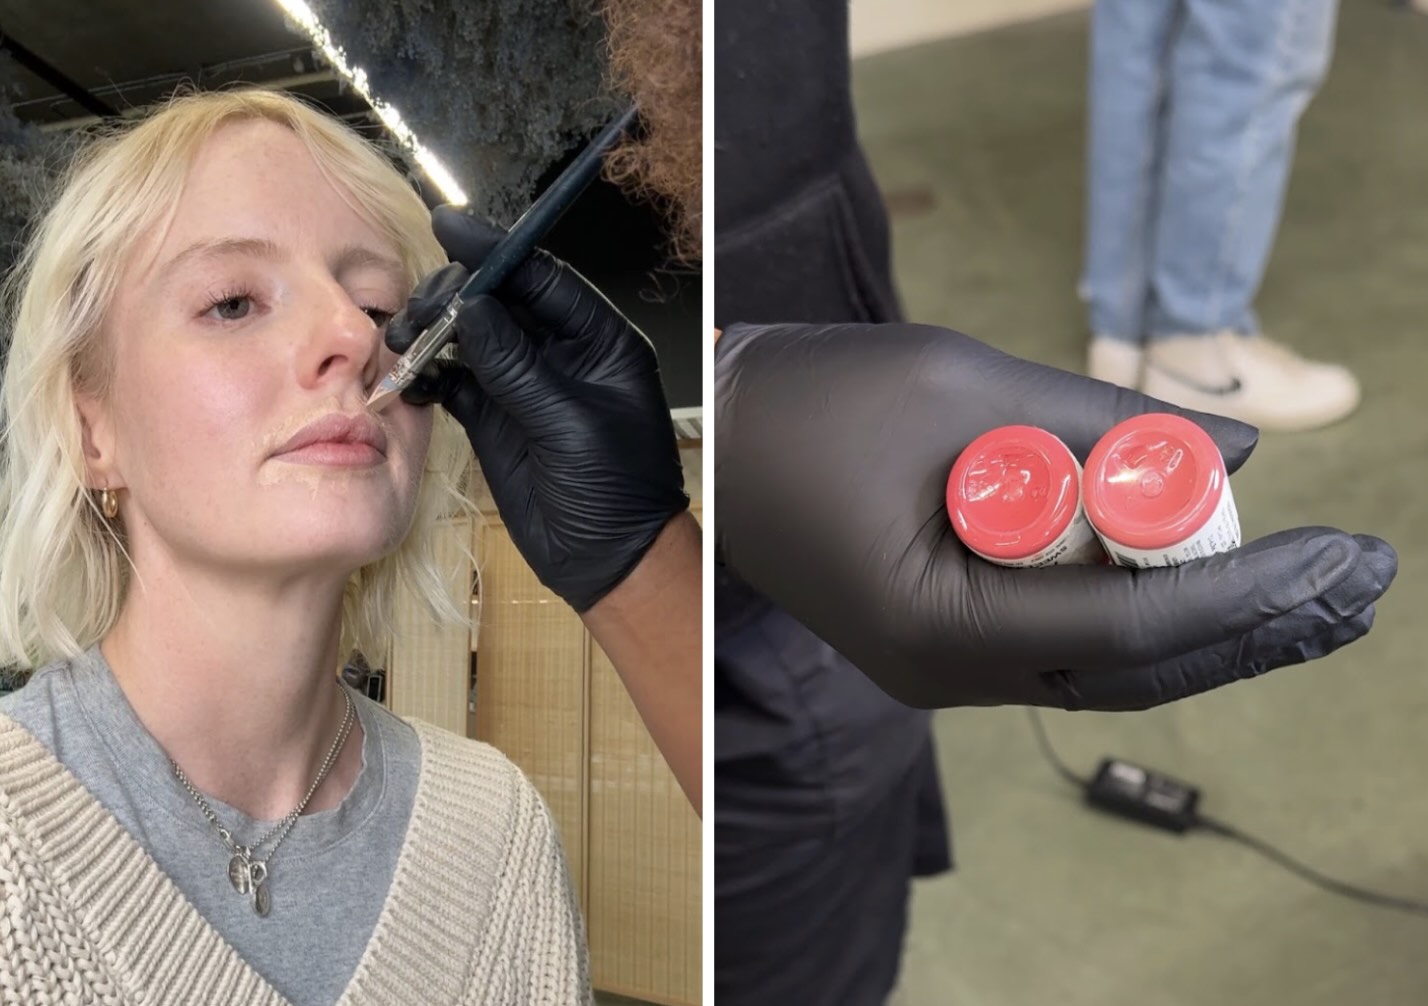
Before we touched pigment, Fruit used a bit of concealer to sketch out the shape directly onto my lips — a visual guide we adjusted together in real time. By the time she stepped back for final approval, it already felt like an enhanced version of my own lips.
While the numbing cream did its thing (about 15 minutes of downtime), Fruit mixed a few different pigments, swatching and adjusting until we landed on the perfect cool-toned, pinky nude with just enough depth to read “my lips but better,” without pulling too warm or too mauve. It replicated the kind of flush my lips would naturally show from a passionate Pride & Prejudice-style kiss or a jaunt through the English countryside (I’ve been on a romance novel train, okay?).
The Tattooing: What It Actually Feels Like
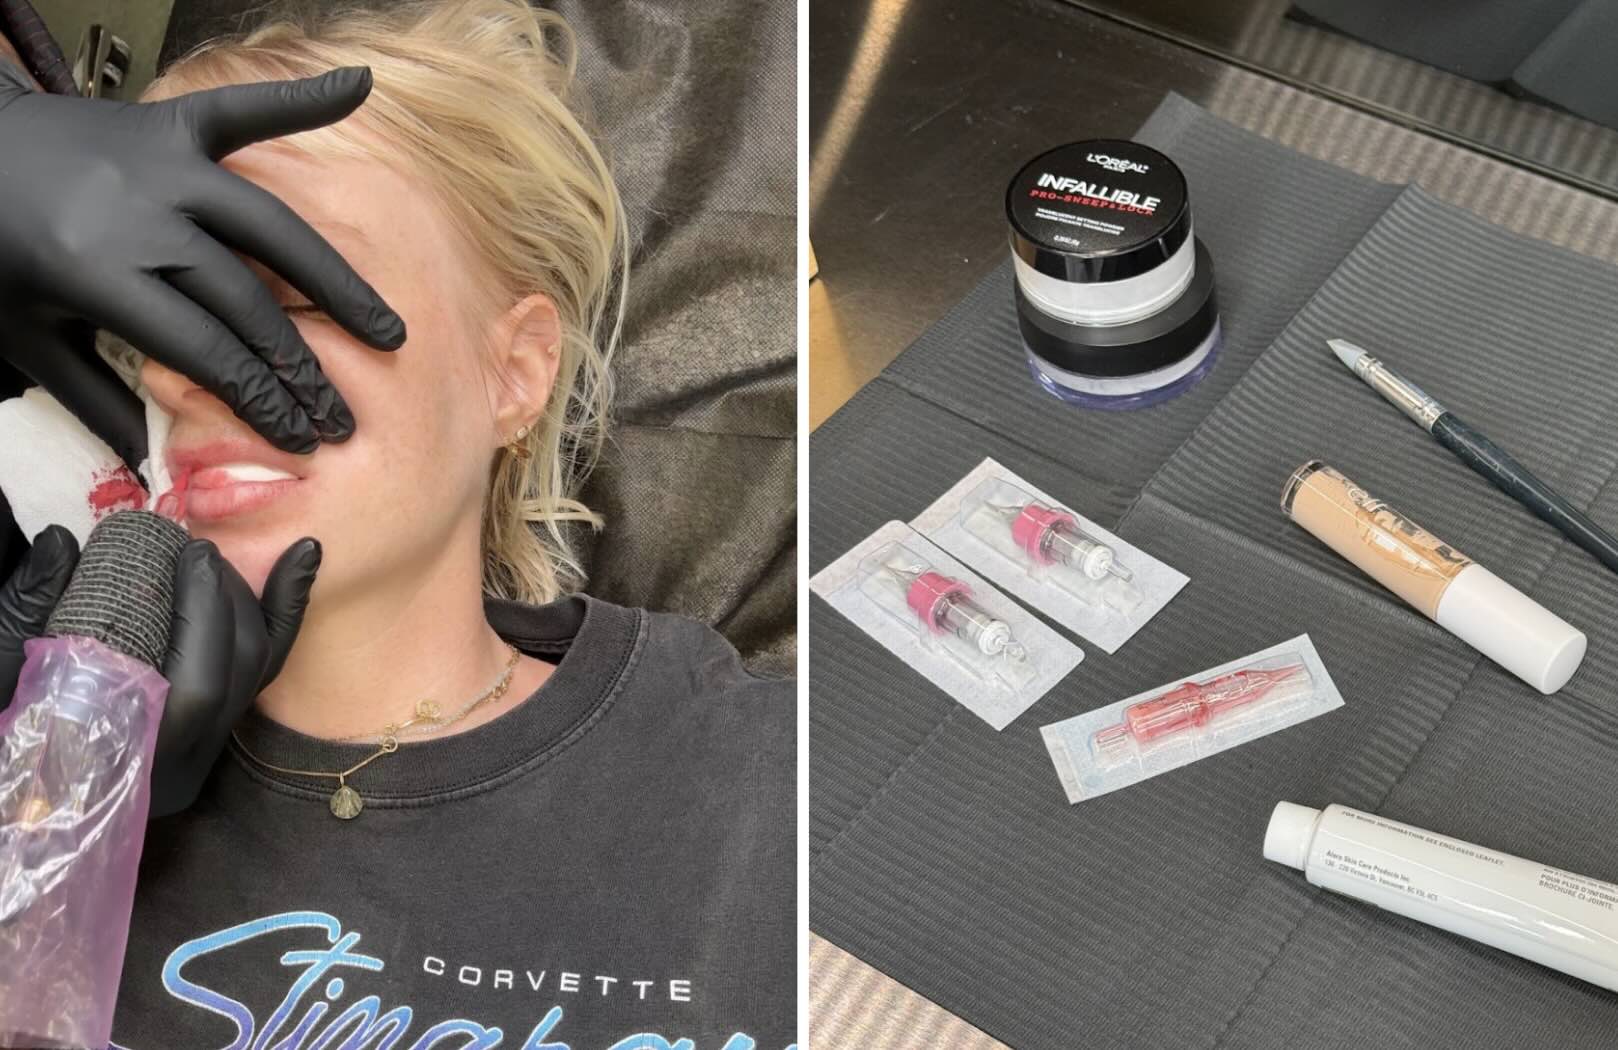
When it was finally time to begin the tattooing, Fruit placed a piece of gauze inside my mouth to protect my teeth from pigment transfer — or what I imagined would be a much more stubborn version of lipstick on my teeth.
Thanks to the very effective numbing cream, the tattooing sensation was practically painless and felt more like a buzzing electric toothbrush grazing over skin. The only real irritation came from the repeated wiping, which left the area feeling slightly raw by the end. While I laid staring at the ceiling, I made a few mental notes to give extra TLC to the area around my mouth in the evening.
Throughout the process, Fruit made sure to check in on how I was feeling and whether I needed any breaks. I opted to power through, save for a quick 15 minute intermission to reapply numbing cream after finishing the outline and before moving onto the interior of my lips.
The actual needles-on-skin time was about an hour — putting the full session from start to finish at roughly two hours total. And once we wrapped, Fruit sent me on my merry way with an aftercare kit of clean lip swabs, Aquaphor, and some gentle cleansing wipes to keep things hydrated and clean.
The Healing Process
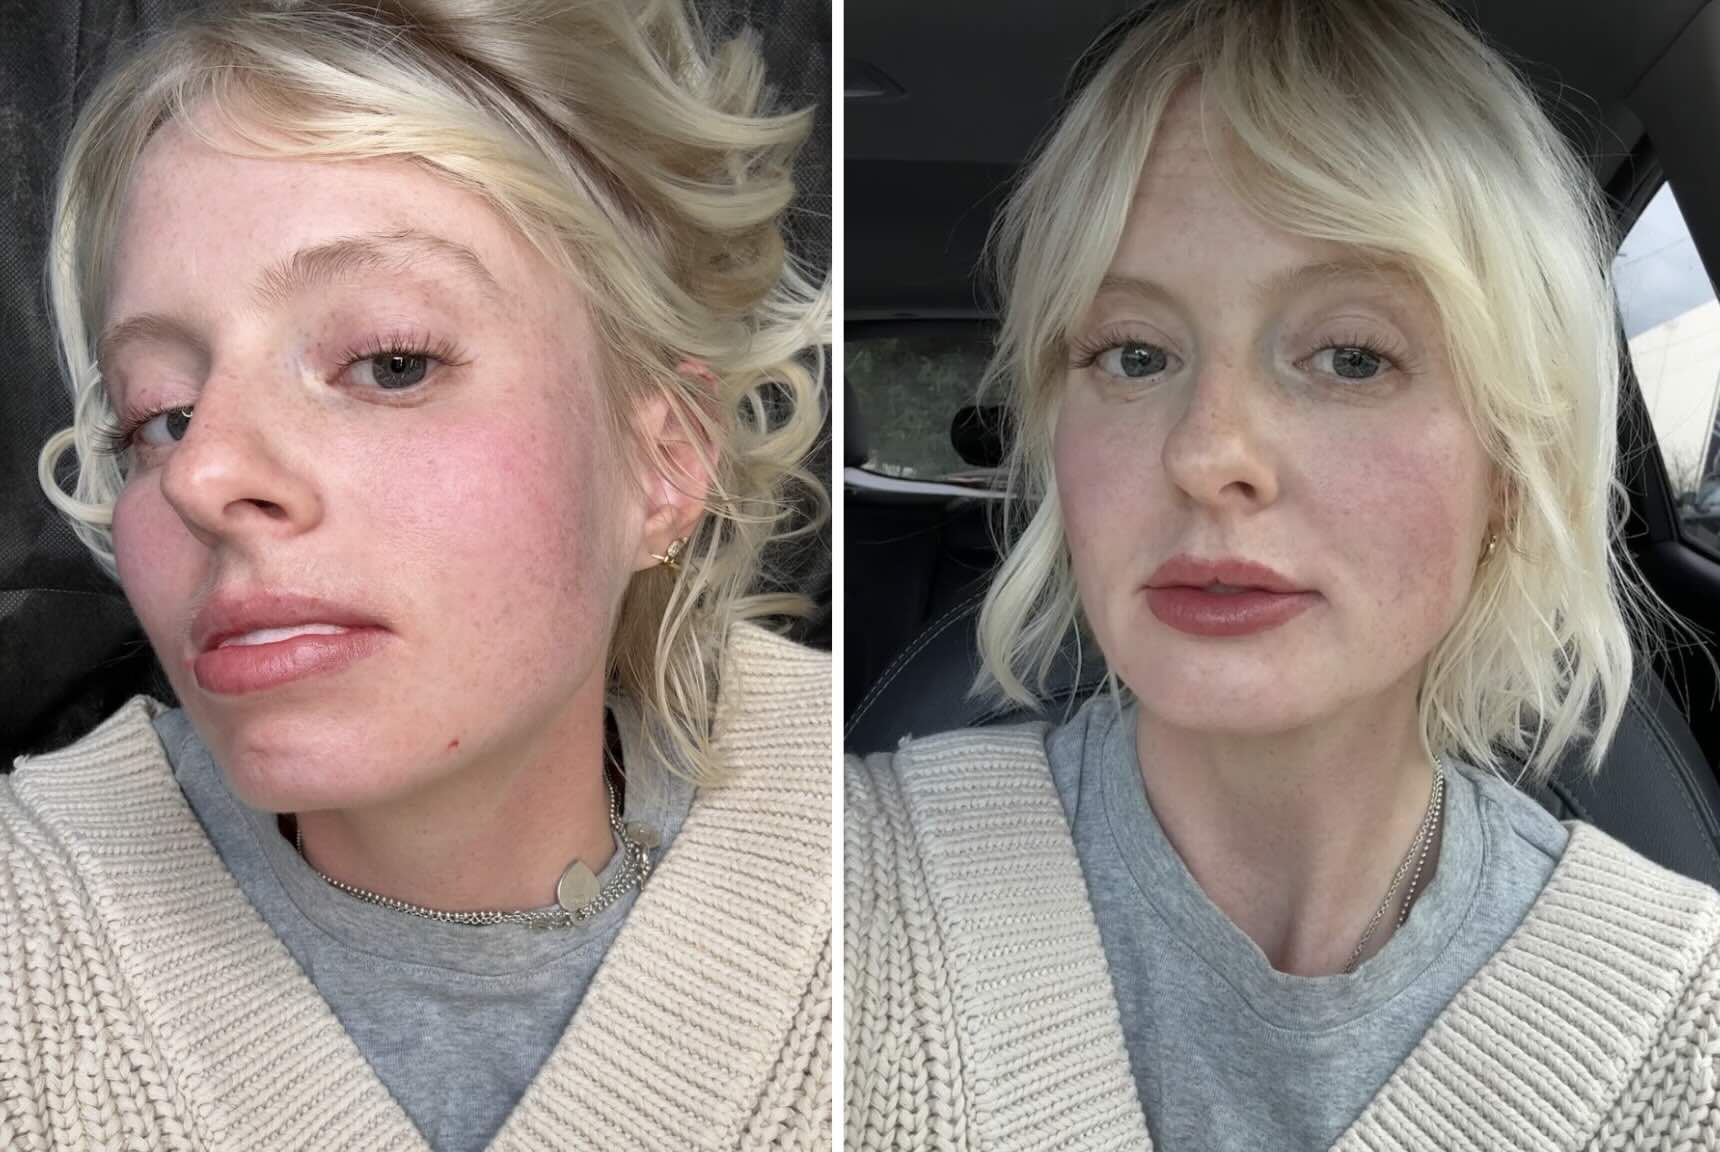
The first 24 hours post-procedure were the most dramatic with noticeable swelling and ultra saturated pigmentation. But honestly, I wasn’t mad at the temporary Bratz doll effect — I knew this was par for the course and it would all die down shortly. By the next morning, the swelling had subsided, and the color had already begun to soften.
Over the next several days, I went through the typical healing phases of dryness, light peeling, and patchiness as the pigment settled. I made sure to follow my aftercare religiously: keep it clean, apply Aquaphor often, avoid sun/heat/harsh cleansers, and don’t pick at the dead skin (aka my biggest temptation).
By week two, the color had softened significantly and there was a pronounced liner-effect along the edge of my lips. Even with some areas of pigment fallout and a touch-up planned for a few weeks later, the first pass of healing still looked incredibly natural.

The Touch-Up and Final Results
At the six-week mark, I returned to Studio Sashiko for my scheduled touch-up. The pigment had settled nicely — soft and even, with just a few spots that needed reinforcement. Fruit took a close look, confirmed the healing had gone well, and suggested we keep the same shade while slightly intensifying the pink to give it a bit more depth. This session moved quickly with hardly any swelling and the same aftercare routine. Easy.
Two weeks later, the final result had settled in as a muted rose with cool undertones, just enough to brighten my face without reading as “lip color”—with a subtly defined shape. Nothing unnatural looking, just a visual zhuzh to add balance. I can still wear lipstick if I want a big pop of color, but now my day-to-day lip routine is a simple swipe of clear lip balm.
If you need me, I’ll be staring at my lips in Zoom meetings for the foreseeable future.