We like
We don't like
Our team is dedicated to finding and telling you more about the web’s best products. If you purchase through our links, we may receive a commission. Our editorial team is independent and only endorses products we believe in.
This is my glow-up year. Or at least the start of many. Since 2020, I have been either pregnant, breastfeeding, or about to be pregnant again – and my fellow moms know that doctors and estheticians won’t let you do jack to your face and body when there’s a baby in there.
Now, two C-sections and a couple undereye bags later, I am done having kids, which means I’ve spent the last eight months making up for lost time: Microneedling and chemical peels, Morpheus8 and CoolPeel (which is, ironically, not “cool” at all), a bit of Botox for brow alignment and a wee spot of top-lip filler for symmetry’s sake. I invested in a couple of high-maintenance treatments for low-maintenance life. I got nanobrows, which is microblading’s less invasive cousin. Then I did what turned out to be, perhaps, the best thing I’ve done all year: lip blushing.

I have dead-fish lips. As in, they are naturally void of color. But to be honest, this never bothered me until recently. The older I get, the less makeup I want to wear. The less I want to do in general. I want to be on Beauty Autopilot. By a miracle of the Beauty Gods (i.e., our mutual friend, Natalie), I was introduced to Jessie Cooling of Woke Up Like This. I was looking for a local beauty confidante and I found one – and she just happens to be a kickass cosmetic tattooer.
What Is Lip Blushing and Who Is It For?
Lip blushing is a cosmetic tattoo procedure in which a customized lip color is applied to your lips with a sterilized tattoo gun (kind of like getting a fine line tattoo). It’s perfect for anyone looking to correct uneven color, add vibrancy to pale or dull tones, or neutralize darker pigment for an even wash of color.
Jessie says some people seek lip blushing for a more defined cupid’s bow, balanced lip shape, or subtle enhancement of natural borders. “It meets the call for anyone looking to save time and money on daily makeup, have a more low-maintenance beauty routine, or for those just looking for a natural sheer tint or stain for your lips, but better!”
My Lip Blush Experience
I can only speak to my experience with Jessie, here in the Raleigh (NC) area, but this should at least give you a foundation of knowledge and point of comparison when looking for a credible artist in your city.
Lip Blush Prep
Before we did anything, Jessie required an extensive consultation to align on shape and color. This involved mapping points of symmetry on my lips using a pre-inked string. She created a pre-drawn shape with a fine-tipped brush and concealer/white paste. Jessie is a perfectionist, so just the shape mapping alone took upwards of 30–45 minutes. This was an important step, though! It was laying the foundation for the lips I’d be living with for the next several years.

Next, it was color time. “Once we map the shape and refine the details, I’m able to clearly see my client’s natural undertones and can best assess what colors need to be added to create their ultimate goal color and saturation level,” says Jessie. She has a variety of shades she can mix to customize the perfect hue. I was looking for something warm, maybe peach-leaning, but because I was so confident in Jessie’s eye for color, I wanted her to take the lead on my custom shade.
After color and shape were set, I booked my first appointment, though Jessie recommended two in total. The initial session sets the base color. But since everyone is unique, there are a few factors to consider: Do you want sheer or opaque saturation? What are your goals and starting point? Are you blushing or neutralizing? Jessie encourages all her clients to book a touch-up 8–12 weeks after the initial appointment. For lip neutralizations, she recommends 12–16 weeks later. (You can always cancel, just be sure it's within your artist’s required time frame!)
I blocked off about four hours for each appointment because just the prep – recreating the shape, mixing color, numbing the lips (yes, there is lidocaine) – takes about an hour. When booking with a cosmetic tattoo artist in your area, don’t be shy about asking the details of their process if that information is not readily available online. You want to be extremely confident in your experience!
My Day-of Lip Blush Appointment
I don't want to scare you but...you can't drink coffee 24 hours before your lip blushing. Honestly, I found this reality to be worse than the pain. The no-caffeine rule is pretty standard for any procedure or treatment in which the skin barrier is compromised. This helps minimize bleeding, as caffeine is a natural blood thinner. (I don’t drink coffee the day of my microneedling appointments, either.) Jessie is a stickler for rules and wants her clients to have the best-possible experience and outcome, so, ugh, I followed her directions.
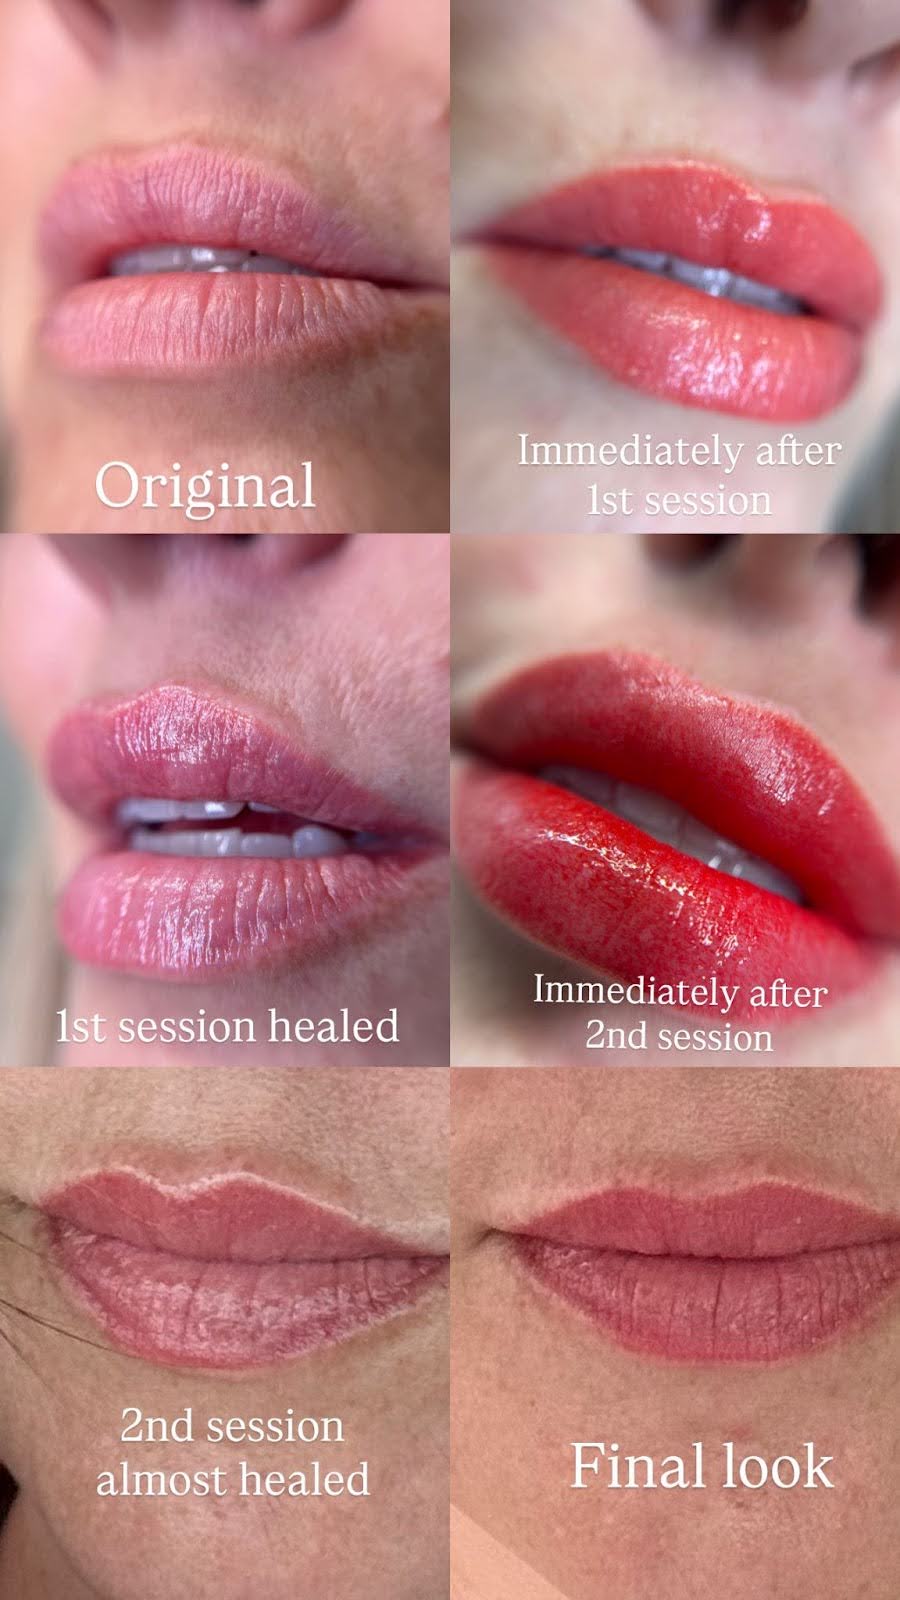
Jessie made sure I was cozied up in her chair with a blanket, since I’d be there for a while. First she recreated our agreed-upon shape, then we tweaked as we saw fit. We both wanted to be sure it was perfect. When the time came, I popped in my earbuds, turned on a podcast, and started zenning out. Jessie began by outlining my lips, then filled in the pout. She does more than one pass, but she did reapply lidocaine mid-way through. Yes, this stings, but it helps keep the pain of the needle at bay.
About four hours later, I had the lips of a Real Housewife: Swollen and bright pink, a look I find a bit dramatic, though some people love it. She reassured me that the day-of and day after would be the most saturated the color would be, and that my lips would fade to the warm, pinkish-peach color we’d discussed.
Jessie gave me strict instructions on how often to care for my lips: how often to gently dab them and apply healing ointment, plus what to expect for the next several days. Yes, there would be peeling. No, I could not get my lips wet. (I even wore a little plastic stick-on visor in the shower to protect my lips from the stream of water. It was a commitment, but well worth it.) The next day, the swelling was nearly gone.
Does Lip Blushing Hurt?
Everyone’s pain threshold is different, so I’ll start by telling you that my pain tolerance is pretty high (though I do think I’m getting soft in middle age). I have 10 tattoos. I don’t have a fear of needles and I’m not especially squeamish. I’ve had three major surgeries in my life. Jessie says most of her clients manage the pain of lip blushing just fine, though some are more sensitive than others and may take more time during their sessions. As mentioned, there is lidocaine, which helps numb the area if you’re worried about how much you’ll feel.
It didn’t hurt so much that I was afraid to go back. A little over two months after my first appointment, I returned to get a slightly more saturated cherry color. I’m grateful she suggested two sessions because after living with my warm peach lips for a couple months, I realized I wanted to be a bit bolder the next time, now that I knew what to expect and how much my color might fade.
How Long Does Lip Blushing Last?
On average, the results from two sessions will last anywhere from 2–4+ years with proper care. “The fade out is soft and gradual,” says Jessie. “The time variance will depend on factors such as body chemistry, how quickly you metabolize the pigment, lifestyle (how active you are, fun in sun and water) skin care protocols (are you using lots of actives and exfoliants over the tattoos?), to name a few.”
Who Is a Good Candidate for Lip Blushing?
“The perfect candidates would have healthy, hydrated lips with no active sores, abrasions, infections, or severe dryness. Those who may not be good candidates would include smokers, those with perpetually dry or peeling lips, anyone in poor health or with a compromised immune system,” Jessie explained. Overall, lip blushing has benefits for most people.
If you have or plan on getting filler, Jessie recommends at least 4 weeks of healing between receiving lip filler and getting lip blush. “This way the filler can settle and fully heal before introducing more trauma to the delicate lip tissue. If you are planning on lip blushing first, you should wait 8–16 weeks before getting filler (depending on factors such as age, health, neutralization vs. blush, etc).”
She says lip blush and filler work nicely together when spaced appropriately, because lip filler can add plumpness to lips that have experienced volume loss, as well as smooth out texture for an evenly diffused color application. Lip filler can also help resolve volume discrepancies and slight asymmetries. “I am often guiding my clients through their ‘lip plan’ so we can time their desired lip services for the best possible outcome.”
Love a Lip, but Not Quite Ready for Lip Blushing?
These are some of my favorite lip products right now – and yes, I even wear them post lip blushing when I want a different look!
Haus Labs PHD Hybrid Lip Glaze: Obsessed with both the texture and appearance, which gives my lips a rich, candy-coated look.
YSL Loveshine Lip Oil Stick: The creamiest, shiniest, stays-on color.
Lawless Forget The Filler Overnight Lip-Plumping Mask: Deeply hydrates while giving my lips subtle volume.
Biba De Sousa The Lip Treatment: I apply this clear gloss every morning for a hydrating boost.
Sara Happ Lip Airbrush & Lip Stylus: Primes my lips with a super-smooth finish before I apply color with a handy mess-free wand.